October 18, 2008

Overdue autumn garden update

Wowee. Is anyone else ready for this election to be over? When that happens, maybe I can go back to Massachusetts and remind myself what my husband, cat and garden all look like. Until then, it's pretty much all work and travel, all the time. At least it's been fun.

So I have Erik to thank for this update that he lovingly wrote for me to keep me connected to my, ahem, roots. Here 'tis:


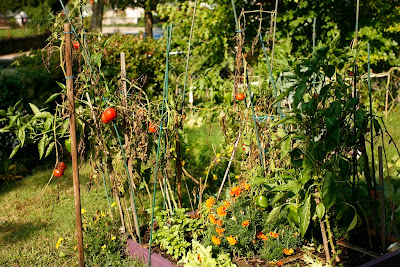
I went out this morning in my role as surrogate gardener and I'm here to report that your garden is happy but it misses you.

As for the front garden. Your peppers are happiest of anyone out there. As you will see, you are continuing to get color on a couple but the majority seem to be pretty certain they're just going to be green. I had to stake up a few as they had been loosing the battle with gravity in our absence. None appear to be over ripening so I'm leaving them up for now.

Parsley and radishes all look great. Basil and chives are continuing their reliable presence. Lettuce is coming along nicely although at a seemingly slower rate than in the spring. The squash plant is still trying to pump out fruit despite the fact that it's support system is withering up.
And I've come to the conclusion that our brussell sprouts are just going to be small. The biggest ones at the base of the plant are all starting to bush out a little bit rather than staying in their compact little head of leaves. Maybe I should try to cook up a few? They're still no bigger than a quarter.
And finally, the sad news, the remaining cantaloupe won't be waiting for your return. Its stem somehow got disconnected and the fruit has turned a ripe-looking whitish orange. I don't know what order that happened in but I'm guessing it was somehow prematurely disconnected from the vine. It is currently the size of a softball. A little rot had set in and it had become home to a number of fruit flies but i took it inside anyway and cut it open. As you'll see it looked quite nice. In it's honor i did try some but to be honest the flavor was so so and it was pretty over ripe and soft.
To the back garden now. Turning the corner of the garage, I found the back garden awash in red. Lots of tomatoes are getting close to ripe and a number had ripened and returned to the ground while we were away. I assume you took down all the squash vines in the back corner because they are now gone. Carrots all look happy (at least the their little green head tips). Purple bean plant is still spitting out purple beans (see the picture of the husky little bean I found) and it has currently got the neighboring tomato plant in a convincing sleeper hold. It is hard to tell where the bean plant ends and the tomato plant begins. And there are some new pink flowers in the bed by the driveway. Compost has been added to and turned. The back compost looks great. Not smelly and I could only identify the most recent additions. The front has a ways to go though and is still very full.

I think that is it.


(Thank you, Erik! - This is what I've been up to here in Ohio.)

October 7, 2008

Not-a-pumpkin pie

Toot tooot!! Arrruuuuuuggaa! Beep beep!

That, dear friends, is the sound of me honking my own horn.

This is because just this past weekend, I sucessfully transformed this:into this:(Thank you, Ramona)

That is to say, I harvested our not-pumpkins and turned them into the most indescribably delicious not-pumpkin-pie I've ever, ever had.

Backing up here. You see, these are not pumpkins:I know this because the seed packet sent to me by my mother described them as "really good acorn-type squash I forget the name." However, there are doubters in our midsts.

Laurie, for one. She swears it's a pumpkin. Now would you believe her?

Erik doubts, too! (this is his best skeptical look)But the real kicker is that my own mother is thowing me under the bus. She claims to have planted the same seeds, and, voila, out popped things that really really resemble pumpkins.
Thanks a lot, Mom.

So here's how to make it, in case you come across any not-pumpkins wherever you live. I've based this recipe loosely off of the Maple Pumpkin Pie recipe I found on Epicurious.com.

Phase 1: prepare not-pumpkin (or use canned pumpkin, but really, what's the point?)

1. Admire not-pumpkin2. Then get someone else to cut it in half. (I couldn't bring myself to do it.)3. Scoop out seeds (I saved mine for you...more on that later)
4. Bake face-down in oven at 400 degrees until soft.


5. Gather ingredients for crust:
  • 2 1/2 cups all purpose flour
  • 1 tablespoon sugar
  • 3/4 teaspoon salt
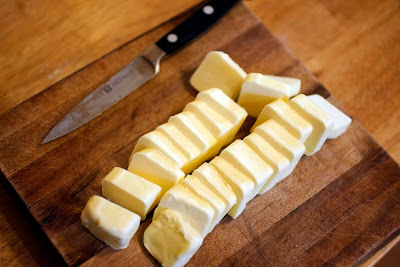
  • 1 cup (2 sticks) cold unsalted butter, cut into 1/2-inch cubes
6. Mix dry ingredients in blender/food processor.
7. Add cold butter chunks and pulse until coarse meal forms. Add only enough ice water to help form dough. Do not over blend. (You can also use iced orange juice if you want.)
8. Turn out onto lightly floured surface, gently form into a ball and cut in half. Cover with plastic wrap, press into disks and refrigerate. The recipe said for 2 hours, but really, just do it until it's cold if you don't have time to wait. 
9. Once chilled, roll out and place into pie plate. Pinch edges, poke surfaces with a fork (to prevent air bubbles from distorting the crust) and bake for about 10 minutes at 400 degrees. Set aside to cool. 


 10. Gather pie filling ingredients:
  • 2 eggs
  • 3/4 cup half and half (I didn't have any, so I used whipping cream and milk)
  • 6 tablespoons pure maple syrup (use a little more)
  • 3/4 teaspoon vanilla extract (use more)
  • 1 1/2 cups not-pumpkin
  • 6 tablespoons (packed) brown sugar (use a little less)
  • 3 1/2 teaspoons all purpose flour
  • 1 1/2 teaspoons pumpkin pie spice
  • 1/2 teaspoon salt

11. Blend wet ingredients well in large bowl. Whisk dry ingredients in second bowl and add not-pumpkin. Add dry mixture to wet mixture and blend well.


12. Pour into pie crust and bake at 400 degrees for about an hour (a touch more) until it's all puffy and doesn't jiggle much when you shake the rack. Allow to cool. (Ha. We didn't and it was still amazing.) Serve with generous portions of fresh whipped cream sweetened with a tad of honey and vanilla.

October 4, 2008

We have stickers!

The fantastic folks at Sticker Giant.com sent me a pretty little package filled with pretty little stickers . . . 1000 of them! So now I have to figure out what in the world to put them on. I started, as you can see above, with a jar filled with the chives I dried yesterday. Hey, if you want some stickers, let me know at citylovescountry@gmail.com

October 3, 2008

Preparing for winter; Part 1 + other miscellany

Usually, fall is my favorite season. But this is not the usual year, for me. This year, I have a garden, and now fall means many new things, some of them ominous.

The gorgeous, almost violent bloom and harvest of this past growing season can't go on forever, and though I plan to try my hand at cold-frame crops over the winter, the time has come to prepare for the season ahead.

So I made a list . . .. . .and then ignored the list because 'turning compost' was #1 and I didn't want to do it.

So onto the tomatoes, which had to go.First, I had to disentangle them from the nine-zillion green twisty ties that secured them to innumerable bamboo posts:I salvaged what ripe tomatoes I could before sending the rest to the wheelbarrow, but most of them were destined for the compost bin.Here's the bed after I removed the tomato plants:
Ideally, I would immediately enrich the beds with finished compost, but when I went to check and turn the compost, I found it to be mid-cook and nowhere near finished. That is to say, it was very stinky and steamy. I don't think it comes through very well in this picture, but you can see some steam rising where I lifted a layer with the pitchfork:(it's not easy to stir and photograph compost simultaneously.

The other composter was further along. I knew this for several reasons. First, the volume had halved (several weeks ago, it was completely full). Second, it didn't reek. And third, it was much cooler. But it has a way to go because some of its components are still recognizable.I'm about to sound like an expert here, but in fact, I have no idea what I'm doing - this is all the result of a little research.)

After a season's worth a growth, it's a good idea to do something restorative for the soil (in addition to enriching with finished compost at some point). Farmers will often plant a crop that fixes the nitrogen in the soil into a more crop-friendly form and then acts as a "green manure" when it's tilled under and decomposes. Many plants in the legume family are good for this (such as buckwheat).

I had a couple to choose from (thank you, Mom), but I decided on the one that sounds like medicine you'd give a cat with indigestion: "hairy vetch."

The seeds of hairy vetch are small and round, like shrunken, smooth peppercorns. I dug up the squares where the tomatoes had been and planted several sprinklings of the seeds. I have no idea what to expect, but we'll see what happens.

While I was poking around in there, I came across a beautiful snail doing some serious damage to the pepper plants:He was relocated to the hydrangea bush.

The final thing on my list was the chives - they were out of control. So I chopped them all down and decided to give a go at drying them in the oven (despite the firm warnings on numerous websites about how they will lose their flavor).

Chopped them up, spread them on some cookie sheets and stuck them in the oven on the lowest setting:I had too many chives to dry in the oven, and I've always wanted to try chive scones, so I decided to try out a (half-made up) recipe:

Don't preheat the oven (I'll explain why later).

sift together:
  • 1 1/2 cups white flour
  • 2 tsps baking powder
  • 1/2 tsp salt

blend with (I used a food processor)
  • 3 tbps butter
  • 1/2 cup (or more) fresh chives

  1. Put flour mixture in bowl and make a well in the middle.
  2. Pour in a little more than 1/2 cup milk, but you want to use as little as you can get away with so the scones will be more flaky than chewy.
  3. Cut in the milk with a knife, and combine just to the point where it all hangs together. Over-working the pastry dough will make it tough.
  4. Turn it onto a floured surface, and roll it out to about 1" thick. Cut the scones out (I used a cookie cutter because I didn't have anything else) and place on an ungreased cookie sheet.
  5. I used an egg wash made of an egg white and a touch of milk, whisked together with a fork. Brush it over the scones.
  6. Sprinkle lightly with fresh-ground pepper and a touch of coarse salt.

Now for the confusing oven part:

I recipe I was using for reference suggested putting the oven at 220 degrees, but after a minute or two, I decided that would be entirely too low a temperature, and cranked it to 405 and eventually to 430 degrees. So next time, I think I would just put them in a cold oven and set it to 405 degrees, so it could rise and bake a bit before reaching full temperature. After it reaches 405, turn it up to 430 so the tops brown a little. Once the tops are golden, they should be done, and it shouldn't take more than 20 minutes, tops.

Here they are (er, were, before Erik ate them all):He calls them "grass cookies." So I guess that's what they are!